

Introduction
To clean a single-serve pod coffee maker, remove and wash the removable parts, clear the pod holder and needle, wipe the machine, then run a descaling cycle and several fresh-water rinse cycles. Clean small parts often. Descale when mineral buildup appears or when the maker slows down.
This guide applies to common pod brewers used in U.S. homes, including K-Cup-style machines and other capsule brewers. Always check your model’s manual first. Some machines have removable water filters, special cleaning modes, or parts that are not dishwasher-safe.

Source: walmart.com
What You Need Before You Start
Gather these items:
- Warm water
- Mild dish soap
- A soft cloth or sponge
- A soft toothbrush or small cleaning brush
- A paper clip or the cleaning tool supplied with the machine
- A large mug or bowl
- A clean, dry towel
- Manufacturer-approved descaling solution, if possible
Unplug the coffee maker before removing parts or cleaning near the pod holder. Let the brewer cool if it has just made coffee.
Do not place the main machine in water. Water can reach the electrical parts and create a shock or fire risk. Clean the outside with a damp cloth instead.
Vinegar or commercial descaler?
White vinegar is commonly used to remove mineral scale, but it is not the best choice for every machine. Some manufacturers advise against vinegar because its smell can linger or because it may affect seals and internal parts.
A descaling solution made for coffee makers is usually the safer choice for a machine that has a specific cleaning program. Follow the product label and the coffee maker manual. Never mix descaler with bleach or any other cleaner.
How to Clean a Single-Serve Pod Coffee Maker Step by Step
The best method has three parts: clean the removable pieces, clean the pod path, and flush the water system.
1. Empty and unplug the machine
Remove any used pod. Empty the drip tray and the used-pod container, if your model has one.
Unplug the brewer. Remove the water reservoir, lid, drip tray, and pod holder only if your manual says they are removable.
2. Wash the removable parts
Wash the water reservoir, reservoir lid, drip tray, and pod holder with warm water and mild dish soap.
Use a soft sponge. Avoid abrasive pads, scouring powder, and harsh spray cleaners. These can scratch plastic or damage labels.
Rinse each part well. Soap left behind can affect the taste of coffee.
Dry the parts with a clean towel or let them air-dry fully. Check your manual before using a dishwasher. Some removable parts are dishwasher-safe, while others can warp from heat.
3. Clean the pod holder
Coffee grounds and wet coffee can collect under the pod holder. Remove the holder if it is designed to come out.
Rinse it under warm water. Use a soft brush to remove packed grounds from small openings. Do not force a sharp object through a part that you cannot remove.
For capsule machines, check the capsule cage and the area where the capsule rests. Coffee oils can build up there even when the machine looks clean.
4. Clear the entrance and exit needles
many K-Cup-style brewers have a top puncture needle and a lower exit needle. These needles can clog with coffee grounds.
Use the cleaning tool supplied by the manufacturer. If your manual allows it, use a straightened paper clip to gently loosen debris. Work slowly and keep your fingers away from the sharp point.
Do not push debris deeper into the machine. Do not enlarge the needle opening. A damaged needle can cause leaks, weak flow, or an improperly pierced pod.
Some capsule machines do not use the same needle design. Follow the cleaning instructions for your exact model.
5. Wipe the brewer
Wipe the outside, control panel, pod area, handle, and area around the water reservoir with a damp cloth.
Clean spills as soon as possible. Dried coffee can become sticky and may attract dust or pests.
Keep water away from the electrical cord, plug, buttons, display, and vents. Never spray cleaner directly onto the machine.
6. Flush the water path
Reassemble the clean parts. Fill the reservoir with fresh water.
Do not insert a pod. Place a large mug under the outlet and run the largest brew cycle available. Repeat until the water runs clear and has no soap or cleaner smell.
If the machine has a “clean” or “rinse” button, use that setting. A plain brew cycle may not clean every internal channel, so follow the manual when a special program is available.
7. Dry and reassemble
Empty the mug and drip tray. Wipe away any water around the base.
Leave the reservoir lid open for a short time so the inside can dry. Reassemble the machine only when the removable parts are clean and dry.

Source: amazon.com
How to Descale a Pod Coffee Maker
Descaling removes mineral deposits from the internal water path. These deposits form when minerals in tap water collect on heated surfaces and narrow the flow path.
Descaling is different from washing. Washing removes coffee oils and visible dirt. Descaling targets mineral scale inside the machine.
Follow this basic descaling process
- Remove any pod from the brewer.
- Empty the drip tray and used-pod container.
- Remove the water filter if the manual tells you to do so.
- Add the approved descaling solution and the correct amount of water.
- Place a large container under the coffee outlet.
- Start the manufacturer’s descaling program.
- If there is no special program, run brew cycles according to the manual.
- Empty the container as needed.
- Rinse the reservoir.
- Fill it with fresh water.
- Run several water-only cycles.
- Repeat the rinse until no descaler smell or taste remains.
Do not drink the liquid produced during descaling. Keep children and pets away from the solution.
How often should you descale?
The right schedule depends on water hardness, use, and the manufacturer’s instructions. A practical starting point is every three to six months for regular home use.
You may need to descale sooner if:
- The machine makes smaller cups than before.
- Brewing takes longer.
- The pump sounds strained.
- Water drips slowly.
- The coffee tastes bitter or chemical.
- The machine displays a descale alert.
- White flakes appear in the water.
A water filter may reduce mineral buildup, but it does not remove the need to descale. Replace the filter on the schedule listed by the manufacturer.
Should you use filtered or bottled water?
Filtered water can reduce the minerals that cause scale. It may also improve taste.
Do not assume every bottled water is ideal. Some bottled waters contain high mineral levels. Avoid carbonated water, flavored water, and distilled water unless the manual specifically approves them. Distilled water can affect sensors in some machines.
How to Clean the Needle When the Coffee Maker Is Clogged
If the machine starts but produces little or no coffee, a blocked needle is one possible cause. Mineral scale, coffee grounds, or a damaged pod can also restrict flow.
Start with the safest checks:
- Turn off and unplug the machine.
- Remove the pod.
- Let the brewer cool.
- Remove the pod holder if possible.
- Rinse the holder with warm water.
- Clear the needle with the supplied tool.
- Reassemble the parts.
- Run two or three water-only cycles.
Do not use force. If the needle is bent, loose, or broken, stop using the machine. Contact the manufacturer or a qualified repair service.
If water leaks from the pod area, check that the pod holder is seated correctly. Also check for a torn pod, excess coffee grounds, or a cracked seal. Continued leaking can indicate a damaged gasket or internal part.
Cleaning Schedule for a Single-Serve Coffee Maker
A simple schedule helps prevent buildup before it changes the coffee.
| Part or task | Suggested timing | What to do |
|---|---|---|
| Remove used pod | After every brew | Discard it and check for loose grounds |
| Rinse the pod holder | Daily or every few uses | Rinse with warm water |
| Empty the drip tray | When full or at least weekly | Wash and dry it |
| Wash the reservoir | Weekly | Use mild dish soap and rinse well |
| Wipe the outside | Weekly | Use a damp, soft cloth |
| Clean the needles | Weekly or when flow slows | Use the approved cleaning tool |
| Descale the machine | About every 3–6 months | Adjust for water hardness and use |
| Replace the water filter | As stated in the manual | Remove and install the correct filter |
The schedule is a guide, not a fixed rule. A coffee maker used several times a day in an area with hard water may need more frequent care.
Signs Your Coffee Maker Is Clean
After cleaning, the machine should:
- Brew at its usual speed.
- Produce a normal amount of water.
- Have no sour, bitter, soapy, or chemical smell.
- Show no visible grounds in the cup.
- Have a clean pod holder and outlet.
- Run without unusual dripping or loud strain.
- Show no remaining descale alert, if the model uses one.
Taste the first cup only after the rinse water is clear and free from cleaner odor. If the coffee still tastes strange, run more fresh-water cycles and wash the removable parts again.
What to Do If Cleaning Does Not Fix the Problem
Cleaning cannot repair every fault. Use the symptom to guide the next check.
| Symptom | Possible cause | Next step |
|---|---|---|
| Little or no coffee comes out | Blocked needle, scale, empty reservoir, air in the line | Clear the needle and run water-only cycles |
| Coffee tastes weak | Wrong cup setting, old pod, clogged flow path | Try a fresh pod and clean the pod path |
| Coffee tastes bitter | Coffee oils, old water, scale, or overheated coffee | Wash parts, replace standing water, and descale |
| Water leaks around the pod | Misplaced pod, damaged pod, dirty seal, or worn gasket | Re-seat the pod and inspect the holder |
| Machine stops during brewing | Low water, scale, overheating, or a fault | Let it cool, check the reservoir, and follow the manual |
| Descale light stays on | Incomplete cycle or insufficient rinsing | Repeat the exact descaling program |
| Coffee maker smells like vinegar or cleaner | Not enough rinse cycles | Run fresh-water cycles until the odor is gone |
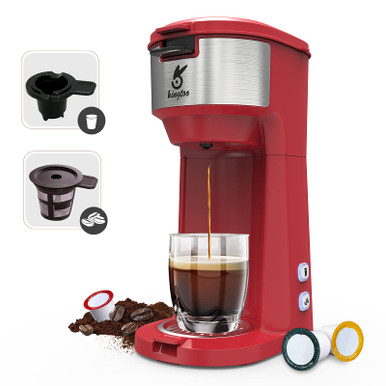
Unplug the machine and seek manufacturer support if it trips a breaker, smells like burning plastic, sparks, has a damaged cord, or leaks into the electrical area. Do not open the case unless you are trained and the manufacturer permits repair.
Source: warehousesoverstock.com
Common Cleaning Mistakes to Avoid
Do not leave water in the reservoir for long periods
Stagnant water can develop an unpleasant smell and may allow buildup. Empty the reservoir when the machine will not be used for several days.
Do not clean a hot machine
Hot water, steam, and sharp needles can cause burns. Let the brewer cool before handling the pod holder or needle.
Do not use bleach
Bleach is not a suitable routine cleaner for the water path. Residue can be harmful if the machine is not rinsed completely. It can also damage materials.
Do not use abrasive tools
Steel wool, knives, and rough scouring pads can scratch plastic and damage seals. Use a soft brush or the tool supplied with the machine.
Do not assume all parts are dishwasher-safe
Heat can warp reservoirs, lids, and small plastic parts. Check the manual for your model.
Do not rely only on a rinse cycle
A rinse cycle removes loose residue. It does not replace washing removable parts or descaling the internal water path.

Source: yallabena.com
Key Takeaways
- Wash the removable parts with warm water and mild dish soap.
- Clear the pod holder and puncture needles gently.
- Run fresh water through the machine after cleaning.
- Descale when flow slows, taste changes, or the machine alerts you.
- Use the manual to confirm dishwasher, vinegar, filter, and descaling instructions.
- Stop using the machine if it sparks, smells burnt, or leaks near electrical parts.
FAQs
How do I clean a single-serve coffee maker without vinegar?
Use a coffee-maker descaling solution approved for your model. Wash the removable parts with warm water and mild dish soap, then run the descaling program and fresh-water rinse cycles as directed.
Can I put my pod coffee maker in the dishwasher?
Usually, only certain removable parts may be dishwasher-safe. The main brewer should never go in the dishwasher or under running water. Check the owner’s manual before washing any part in a dishwasher.
How do I clean mold from a pod coffee maker?
Unplug the machine and wash removable parts with warm water and dish soap. Replace any filter that shows mold. If mold or a musty smell remains inside the water path after cleaning and approved descaling, contact the manufacturer before using the machine again.
Why does my coffee maker still taste bad after cleaning?
The cause may be cleaner residue, old water, coffee oils, scale, or the pod itself. Run more fresh-water cycles, wash the reservoir and pod holder again, replace the water filter if needed, and descale according to the manual.
How often should I clean a pod coffee maker?
Rinse the pod holder often, wash removable parts about once a week, and descale about every three to six months as a starting point. Use a shorter interval for hard water or heavy use.
Conclusion
A clean single-serve pod coffee maker needs regular washing and occasional descaling. Start with the removable parts and pod needle, then flush the water path with fresh water. If the machine still brews slowly, leaks, or smells burnt after proper cleaning, stop using it and contact the manufacturer.